
If you have just started your photography journey with your DSLR, you will have to start using Manual mode. Because manual mode gives much more options to control settings. By setting up right ISO, Shutter speed and Aperture, You can play with available light in a better way.
In this article Let me explain What is ISO, Shutter speed and Aperture.
1.ISO:
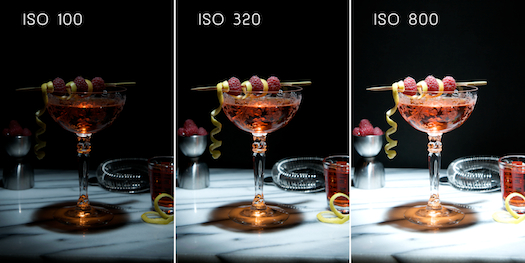
ISO is essentially a camera’s sensitivity light, basically you set ISO before you go out for a shooting. You will have to set it depending upon availability of light. Example if you have enough sunlight outside, 100 ISO will be enough.
You should consider changing your aperture and Shutter speed once you set ISO.
This works like something like this: If you are in a place where there is very less light you will have to shoot up ISO. As you increase ISO your images get brighter.
You can see the same in this image

Picture Courtesy: http://whiteonricecouple.com
You should also observe noise level in the image. If you increase ISO you are allowing camera to produce more noise.

If you are buying a camera you should observe the noise patterns of the model. The ideal ISO threshold for most of the DX cameras is 800. Some cameras may produce good results at ISO 1600. FX cameras can produce images without noise at ISO 3000 as well. This one of the reasons why professional photographers prefer Fx cameras.
A little amount of noise is still fine if you are using images for your website or social media. But if you are going for larger printing, noise on the images will be easily noticeable.
As far as best practices is concerned, Keep your ISO as low as possible and use Aperture and Shutter speed to get better exposure. Keeping Lower ISO will give you rich colors, smooth and Low Noise images.
Also read: aps-c vs full frame
2. Aperture
Aperture is the measurement of how open or close the IRIS in the lens which allows more and less light. It also plays a major role in controlling the depth of field.
If you ever wanted to learn to take the picture with blurred background, then here is what you were looking for.

Your aperture is controlled by F Stop numbers.
In photography, a ‘stop’ is a measurement of an exposure, depending on either the shutter speed, the ISO or the aperture.
To be specific, if you were to increase the exposure by one stop, you would be doubling the exposure. So, for example, your aperture is f/4, shutter speed is 1/100 and ISO is 100. If you keep the aperture at f/4 and the shutter speed at 1/100 but you increased the ISO to 200, you have increased the exposure by one stop.
Lower the number, the more open it is and more open it is the more shallow depth of field.
Eg: F1.4 is pretty open it allows lot of lights and gives higher depth of filed and F20 is almost closed it allows less light in to the body and gives less depth of field.
3. Shutter Speed:
Shutter speed, also known as “exposure time”, stands for the length of time a camera shutter is open to expose light into the camera sensor. If the shutter speed is fast, it can help to freeze action completely, as seen in the above photo of the dolphin. If the shutter speed is slow, it can create an effect called “motion blur”, where moving objects appear blurred along the direction of the motion.
This effect is used quite a bit in advertisements of cars and motorbikes, where a sense of speed and motion is communicated to the viewer by intentionally blurring the moving wheels.
If you are shooting in a sunlight, you would not allow shutter to be kept open for longer time so you use faster shutter speed. One more important thing is that if you keep your shutter open for longer your images get blurred.
Fast Shutter:
If you wish to capture a sharp image of fast moving subject, you should use very fast shutter speed. Eg: 1/1000

Slow Shutter:
Sometimes you would need to keep your shutter for longer time if you wish to capture water falls like a milky flow or Time lapse photo of night traffic. All the motions will be captured if you keep the shutter open for as long as possible.
 Please note: Using Tripod is mandatory if you are keeping your shutter open for longer duration.
Now its very important to learn how to make combination of ISO, Shutter speed and Aperture to produce the image you are trying to capture.
If you really want to learn the professional photography learning these 3 controls are very essential. And try producing images with different settings using manual mode so that you will start understanding each functions.
If you are not comfortable with manual mode completely, you can start with semi manual modes like Aperture priority mode (Which sets shutter speed automatically) Shutter Priority mode which sets aperture automatically to start initially.
Keep taking as many pictures as possible with different settings and see how each settings making difference in results.
Hope this article helped you understanding ISO, Aperture and Shutter speed.
Don’t forget to provide feedback below.
Happy Clicking!!


Very informative article.
Helpful for photography beginners.
Informative article about Photography Fundamentals.
How to avoid noise while using higher ISO?
Great article. I always had a doubt on using manual setup in DSLRs now I am pretty clear.
This article helps me understanding basics of photography settings such as ISO shutter speed and Aperture. Thanks again.
Darren Fells Jersey
“I know nothing about Shutter Speed and camera settings” “This is the first I heard about it, you’re telling me.”